Getting started
- Introduction
- Know where to get help
- Use RCP for the right reasons
- Use the correct version of RCP
- Use the correct tools
- Set up a target platform
- Mirror Eclipse repositories
- Create a product configuration
- Define products with feature based dependencies
- Remove versions from product dependencies
- Always run code using a product configuration
- Get your product building right away
How hard is it to run an application?
As Eclipse RCP developers, we’re always running our applications in the Eclipse IDE. We make a change, we run the code, make another change, run the code again. This shouldn’t be a hard thing to do, and in general it isn’t. But RCP apps do present some unique challenges in this area.
In Eclipse, we always run code using a run configuration. These configurations specify various details of what to run and how to run it. For example, to run an RCP application we need to specify:
- The application or product to run, specified by its id
- The set of bundles that should be available at runtime
- Bundle configuration details such as start-levels
- Bundle locations, in particular whether a bundle is in your workspace or in the target platform
- Launch arguments
- Miscellaneous other details, such as tracing configuration
That’s a lot to specify, but luckily we don’t have to do this by hand. The PDE tooling is smart enough to generate these run configurations for us. Unfortunately, the ways in which this is done can introduce other complications. If you’re interested in the details, check out this post I wrote a while back.
Creating a run configuration
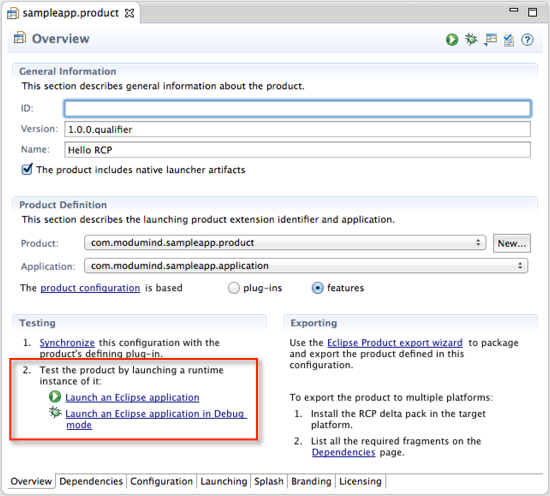
The best way to generate a run configuration for an RCP application is to use a product configuration file. In this file we specify all of the information listed above on the various tabs of the editor. Of course, the set of bundles will actually be specified by listing features, as I discussed earlier. Finally, the run configuration itself is created when you click on the Launch an Eclipse application link on the Overview tab of the Product Configuration editor.

Once you create the run configuration, you can run it again by clicking the Run button on the toolbar.

It’s important to understand the difference between running from the link and running using the toolbar button. Running from the link will re-generate the run configuration from the current state of the product and then run the application. If you manually make changes to the run configuration (e.g. add a launch argument) and then run using the link, your changes will get overwritten. Running from the toolbar simply runs the latest version of the run configuration.
Fully leveraging the product configuration
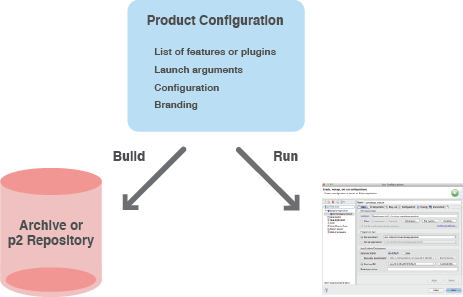
Product configurations are extremely useful because they capture in one place all of the little details necessary to run and build your application. This dual role of product configurations is the key to using them successfully.

To fully leverage product configurations you should always run your code using the link on the Overview tab of the Product Configuration editor. Doing this guarantees that what you run in the IDE matches exactly what you’ll get in the build – the list of bundles, start-levels, launch arguments, everything.
Running using the toolbar button often results in using stale configuration information. Even worse, manually modifying the run configuration introduces configuration details that will never make it into the build. For example, many developers go into their run configuration and click the Add Required Plug-ins button. This fixes the problem at hand (getting the app to run in the IDE) but results in an invalid build configuration.
Final thoughts
Running using the link may seem a little awkward at first, but I can tell you from experience that it will save you many hours of frustration. I’ve mentored many RCP developers and run configurations are one of the most common source of problems. Almost always, the problem could have been avoided if the developer was consistently generating run configurations from the product.
