Most of the teams I work with are creating hybrid Eclipse RCP applications, meaning that they’re working with a combination of the base RCP 4 platform and the Compatibility Layer which supports the traditional extension points and frameworks that the Eclipse IDE itself is based on.
But in these hybrid applications, there is still a lot of opportunity to use newer RCP 4 features, such as:
- Dependency Injection
- Lifecycle annotations
- A live workbench model based on EMF
- CSS styling
In this post, I want to focus on some very simple ways to incorporate dependency injection into RCP 3 style views and editors.
Using a part site to access the Eclipse context
Dependency injection in Eclipse RCP is supported by a context (basically a map) that contains all of the objects that may potentially be injected. This ranges from workbench model elements (MPart, MWindow, etc) to OSGi services provided by the framework or by your own team.
In RCP 3 parts that extend ViewPart or EditorPart, it’s very easy to access this context programmatically using a part’s site. Essentially, these blocks of code do very similar things.
MPart part = getSite().getService(MPart.class);

MyOsgiService myService = getSite().getService(MyOsgiService.class);
@Import
private MPart part;

@Import
private MyOsgiService myService;
Once you have access to the context in this way, you can do things like:
- Use workbench model elements such as
MPartto store persisted state. For those of you working with mementos, try working withMPart.getPersistedState()instead. - Move away from
Activator-based access to resources and in particular OSGi services. If your Activators are full ofServiceTrackers and accessors for OSGi services, you can now directly access these services in your parts.
Using @Inject directly in RCP 3 views (and editors)
While using a part’s site to access the context is a simple way to get started, it’s also possible to use the @Inject annotation directly in RCP 3 parts. For views, this functionality has been available since Oxygen.
To make an RCP 3 view (extending ViewPart) injectable, you’ll need to set the inject attribute for the view extension.
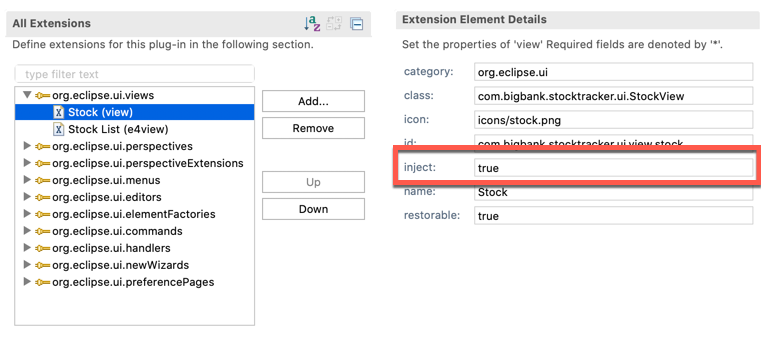
Once that is done, you can use DI normally for instance variables and for regular methods. DI is not available for constructors.
Also, though this attribute is only available for views, it’s also possible to turn on injection for editors by adding the following lines of code to your init method.
MPart part = site.getService(MPart.class);
part.getTags().add(IWorkbenchConstants.TAG_USE_DEPENDENCY_INJECTION);
Wrapping up
This is not meant to be an exhaustive description of how to use dependency injection with the Compatibility Layer. Other mechanisms include the e4 Bridge, the e4view element of the views extension point, and using RCP 4-style model fragments. Each of these more advanced mechanisms has trade-offs, but if you want to move in the direction of creating true POJO-style RCP 4 parts, they’re worth looking into.
But if you’re looking for a simple way to access the Eclipse context or use dependency injection without refactoring your existing code too much, I think the mechanisms described here are the best approach.